Making your first plug-in
This page will guide you through all the steps needed to create and build a plug-in without having to worry about what the plug-in does. This will give you a handle on the basic workflow needed to develop a plug-in before getting into the details, so that you have a frame of reference when reading other pages in this manual.
Plug-ins are typically developed within a project. If you are not familiar with projects, you should spend a little time getting comfortable with them before proceeding.
Creating the plug-in task
In projects, plug-ins are developed within a plug-in task folder. Everything inside the task folder will be included in the finished plug-in. Strange Eons includes a wizard to guide you through the process.
To start adding a plug-in task, right click on the project root in the project pane and choose New/Plug-in. The project root is the folder that the project is stored in, at the top of the list.
This will open the Add New Task dialog:
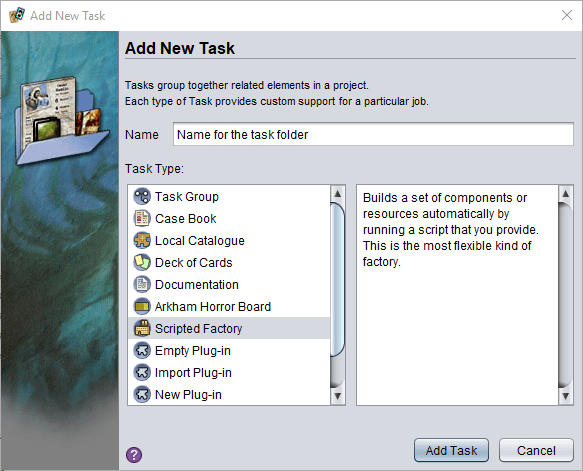
Fill out the dialog:
- In the Name field, enter
My First Plugin. - In the Task Type list, choose New Plug-in.
- Choose Add Task.
Plug-in wizard, page 1
This will create a new, empty task folder named My First Plugin, then open the New Plug-in Task wizard. You will step through the wizard one page at a time to provide some basic configuration details.
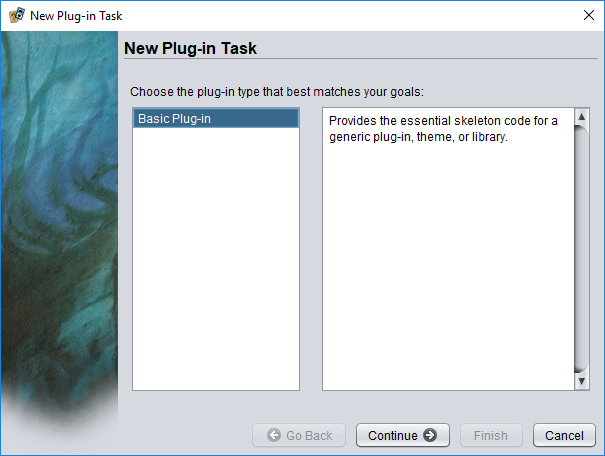
The plug-in wizard is extensible. Developers can add different “kits” to help create plug-ins for different circumstances. On this first page, you are choosing which kit you want to use through the rest of the process. The rest of the pages you see depend on the selected kit. However, only one kit is built in to the app, Basic Plug-in:
- Select Basic Plug-in if it is not already selected.
- Choose Continue.
Plug-in wizard, page 2
On the second page of the wizard, you choose the type of plug-in you want to create. Choosing one of the types will display a brief description of that choice to the right. For this example, you will create an activated plug-in (a plug-in that the user activates from the Toolbox menu). However, extension plug-ins are the most commonly created type, and the type you would create if you wanted to define new kinds of game components.
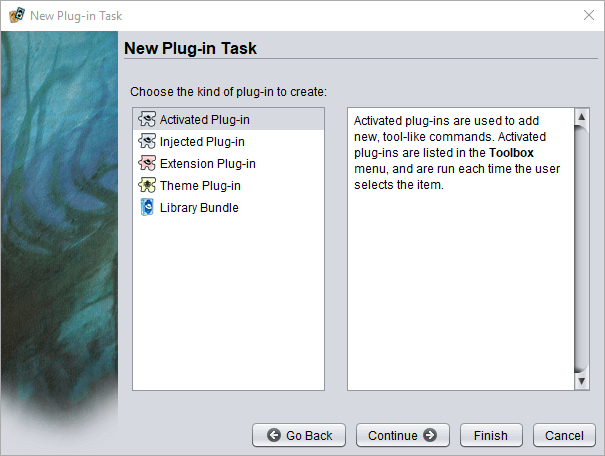
- Select Activated Plug-in if it is not already selected.
- Choose Continue.
Plug-in wizard, page 3
On the third page of the wizard, you will select how you want to write the code for the plug-in. You can either use script code written with a dialect of JavaScript, or compiled code written in Java. Script code requires no additional tools. For Java code, you will need to install a JDK (Java Development Kit) and will probably want to install other tools as well (such as a Java IDE). This will be a scripted plug-in.
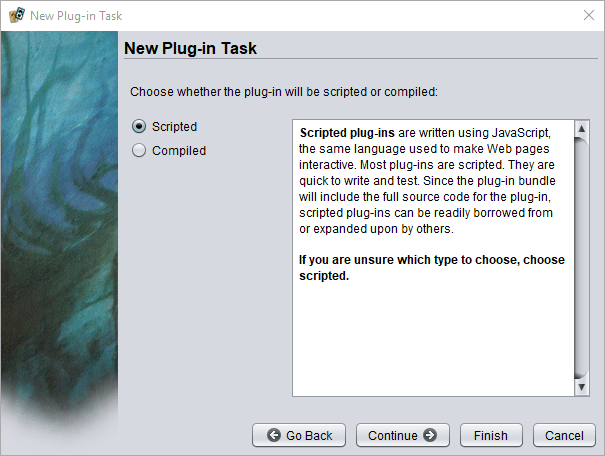
- Choose Scripted if it is not already selected.
- Choose Continue
Plug-in wizard, page 4
On the fourth and final page of the wizard, you provide a few details about the name and structure you want to use. The name, description, and icon you provide will determine how the plug-in is listed in the plug-in manager. The bundle name is the file name of the finished plug-in; this file is what the end user will install in order to use your plug-in. The script name is the name of the script file that hold your plug-in code. The location defines where in your plug-in bundle the script and other resources will be stored. You should use a subfolder of resources with a unique name, perhaps based on your own name or the plug-in you are creating. This is because plug-in resources are visible to each other, so if two of them have the same path name they will interfere with each other. The wizard will suggest a default name based on the account name you are logged in under on your device.
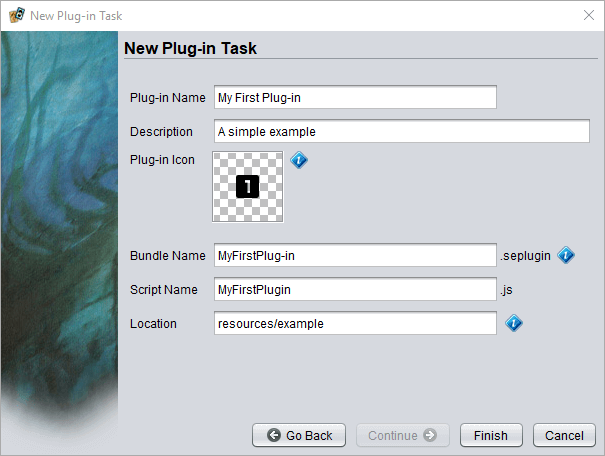
- In the Plug-in Name field, enter
My First Plug-in. This will automatically fill in some of the other fields with suggested values. - In the Description field, enter
A simple exampleor another short description. - Drag and drop an image file onto the Plug-in Icon image chooser (or click it to choose a file).
You can use this:
- You can leave the Bundle Name and Script Name fields set to the defaults generated from the Plug-in Name.
- In the Location field, enter
resources/example. If this was a real plug-in, in place ofexampleyou would enter the unique string you want to use to prevent file conflicts with other plug-ins. - Choose Finish. The plug-in task folder will be filled in with some starter files and the wizard will close.
Examining the generated files
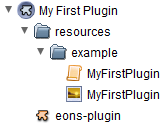 After the wizard completes, the new task folder will be filled in with files. The main plug-in files are stored in the
 resources/example subfolder you entered as the Location. These are the plug-in’s script file, MyFirstPlugin.js and the icon for the plug-in, stored in MyFirstPlugin.png. If your plug-in required images, fonts, or other resources, you would also store them in this folder (or in a subfolder of this folder). The third file, named eons-plugin is called the plug-in’s root file. This file contains the information Strange Eons needs to locate the plug-in script when loading the plug-in. When a plug-in is going to be added to the plug-in catalogue, this file also contains the information needed to create its catalogue listing.
Double click the main plug-in script, MyFirstPlugin.js, to open it in the code editor. Plug-in scripts must define functions with specific names; Strange Eons will call into the script using these function names when it needs the plug-in to carry out the associated action. You can scroll through the code and examine the functions. Each has comments above it to describe its purpose.
Building the plug-in bundle
When a plug-in is ready to be installed, its files are packaged up into a single file called a bundle, similar to a ZIP archive.
To create a bundle from a plug-in task folder, right click the task folder and choose Make Plug-in Bundle.
If the plug-in includes a lot of large files, this may take several seconds. For this example, it will be nearly instantaneous. Once packed, the new bundle will appear in the project pane, selected.
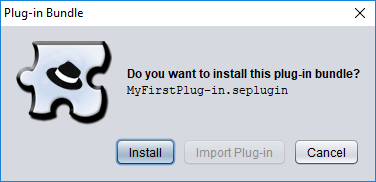
To install a bundle from a project, double click the bundle file and choose Install in the dialog that appears.
Trying out the plug-in
Once installed, the plug-in will be loaded. Since this is an activated plug-in, its purpose is to add a new command to the Toolbox menu. You will be able to find it listed there now. If you choose the item, the run() function in the plug-in script will be called, printing a message to the script console. Once you are done, uninstall the plug-in.
Testing a plug-in
Often, a plug-in bundle can’t be installed multiple times without restarting Strange Eons. To make development easier, you can test plug-ins using a separate test edition of Strange Eons. Once you are done testing, you can close it and pick up where you left off. However, depending on the type of plug-in you are developing, there are usually ways to avoid having to fully install the plug-in. For example, in an activated plug-in you could temporarily add code to the script to call run() and then test the script by running it directly from the code editor.
To test a plug-in, right clicking on a task folder or bundle and choose Test Plug-in.