Preview area
When editing a game component, the preview area shows how the finished component will look. For components with more than one face (such as front and back sides), the previewer will include a tab for each face so you can choose which face to preview.
Navigating around a component
Initially the component will be sized to fit nicely in the preview area. You can zoom in and out by spinning the mouse wheel while the pointer is over the preview. The current zoom level is shown in the lower right corner. When zoomed in, you can drag with the left mouse button to pan around. To return to the default zoom, right click the mouse.
As you move the pointer over the preview, a circular loupe will appear under the pointer if you are viewing the preview at less than the actual size it was drawn at. The loupe shows the area under it at full size. (Increasing the preview quality setting generally causes the preview’s actual size to increase.)
Ink Saver
To save ink or focus on game design rather than typesetting, you can switch to a simplified rendering of your game component using View/Ink Saver. By default, this renders only the component’s text and shapes on a white background. (Some components may optionally render other elements.) Note that this option affects all component drawing, including when printing and exporting.
Quality settings
You can change the quality of previews from the View menu. On most systems, one of the two highest settings will work best. On low end computers you may want to lower this setting for a smoother workflow. Be aware that, depending on your graphics hardware, the lowest setting can actually be slower than the medium setting.
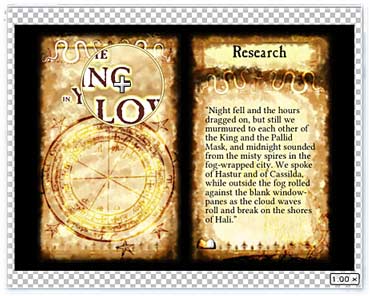
Backdrop
You can change the background behind the preview area using View/Preview Backdrop. The available options are Dark (the default), Light, and Checked. The Checked option (shown above) can be useful when working with shaped or translucent components.
Edge finish
You can change whether or not a bleed margin is shown in the preview area using the View/Edge Finish menu. The available options include:
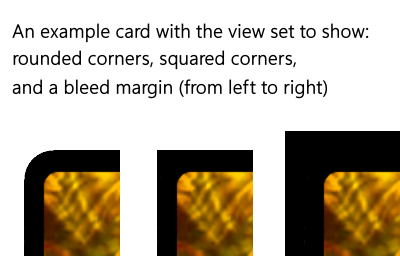
- Rounded corners: If the design specifies that the face has rounded corners, the corners will be “cut off “ in the preview, matching the intended finished product. (If the design does not have rounded corners, then the result is the same as Square corners.)
- Squared corners: The design will not include a bleed margin, and round corners are not clipped. If you do not have a fast CPU or are low on memory, this option usually gives the best performance.
- Include bleed margin: The design is shown with a 9 point bleed margin, similar to how it would be prepared for commercial printing. If the design includes a true bleed margin, that will be used. If it does not, a bleed margin will be synthesized. Because this needs to be done quickly, the quality of the result can vary, but it is usually good enough. Since the error made by commercial printers is typically only a fraction of the standard bleed margin width, even a bad synthesized margin is acceptable in most cases.
Faces that include transparency, such as those with non-rectangular shapes, usually do not support bleed margins. In this case, the bleed margin has no effect and the result is the same as choosing square corners.